Are you ordering parts for a solar system and want to be sure that all the parts you need are included and shipped in one go – so that you can set it up in one afternoon rather than over several days or weeks?
Or,
You are ordering a complete kit and want to be sure it includes everything you need to set up a functional off-grid solar system in one go.
Regardless of your situation, having a component list with you can save you time that you’d otherwise waste following up on getting replacements, or even just the frustration of waiting for them to be delivered.
I have compiled a component list to help you get you started.
To list out the components, I drew from interactions with other customers just like yourself – who were setting up their off-grid solar system.
Note. This list is only intended as a guide. There’re always variations in solar systems and depending on the design some, more, or different parts may be required.
Always consult a qualified solar professional.
Sample Offgrid Solar System Diagram
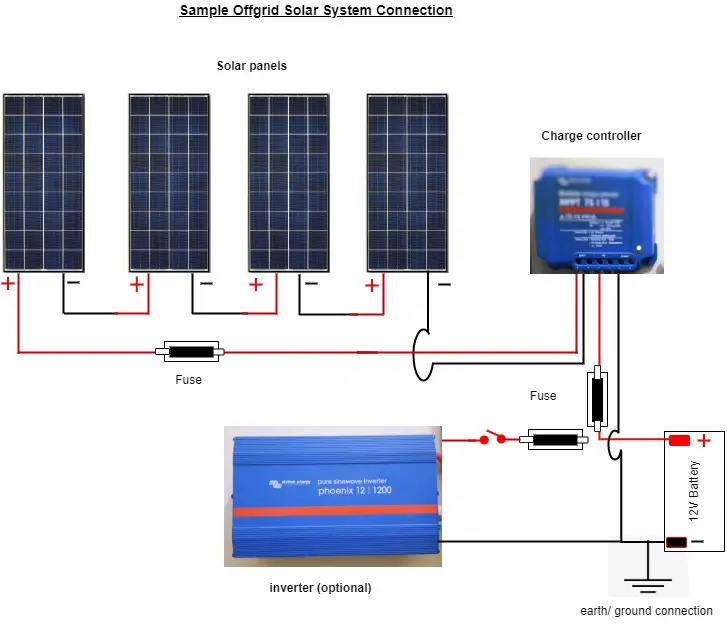
Offgrid Solar System Sample Parts List
| No. | Item | Description |
| 1 | Solar panels | |
| 2. | Mounting system (brackets for the solar panels) | You’ll need a set of brackets and fasteners for each set of solar panels so that you can fix them to the RV roof, shed, garage, own built frame, or other. Note: if RV roof, shed or other, you may have to apply a sealant abound the brackets and fasteners to stop the water from seeping through the spaces created. |
| 3. | Cables | An adaptor kit (connecting solar panels to charge controller). Make sure to get long enough cables! Customers often complain that the cables are too short and need longer cables or extensions. Better too long, you can roll them up than too short! 1 set of tray cables – copper cables for connecting the charge controller to the battery Y branch connectors for connecting wires in parallel. How many you require mainly depends on how many solar panels and whether you plan to connect them in series or parallel. Make a drawing of the solar panels on a piece of paper showing how you plan to connect them. Will you connect them in series, in parallel, or use a combination – one or more parallel strings of solar panels connected in series? Use this to work out how many Y-branch connectors you need. As a guide – Plan for a Y-branch connector for each pair of positive or negative wires you need to connect in parallel. |
| 4. | Bluetooth module (optional) | Available with some charge controllers. Use it to monitor solar system performance conveniently from a distance using a smartphone or laptop |
| 5 | Battery temperature sensor (recommended) | The charge controller makes adjustments to the charging process depending on temperature for the best battery performance so that the batteries last and appliances run for the intended runtime. |
| 6 | Fuses | Recommended – charge controller to battery fuse (usually ANL type) – inverter to battery fuse (usually ANL type) – solar panel to charge controller fuse (usually inline) |
| 7 | Inverter (optional) | Only consider if you plan to run appliances that use AC (grid-like power) |
Did I miss something? Let me know.
Hope this helps.
If you need help figuring out how you can connect the solar panels, and where to install the fuses check out the free wiring diagrams for 200-watt, 400-watt, and 800-watt solar systems.
Hopefully, using it gives you a positive experience when setting up your solar system!